Every REACH plan includes an unlimited number of admin users for your account.
It is highly recommended that more than one Admin User be included on all REACH accounts. Should a person become incapacitated or unavailable for any reason (death, illness, injury, etc.), having an additional Admin User listed is a best practice for any contingency plan.
REACH clients using the Essentials, Pro and Pro Plus plans have Admin Permissions, which is the option to set access permissions and system notifications for each user.
View our Role Based Admin Permissions Guide for our suggestions for which permissions and notifications admins should have based on their role with your organization.
Adding new Admin Users
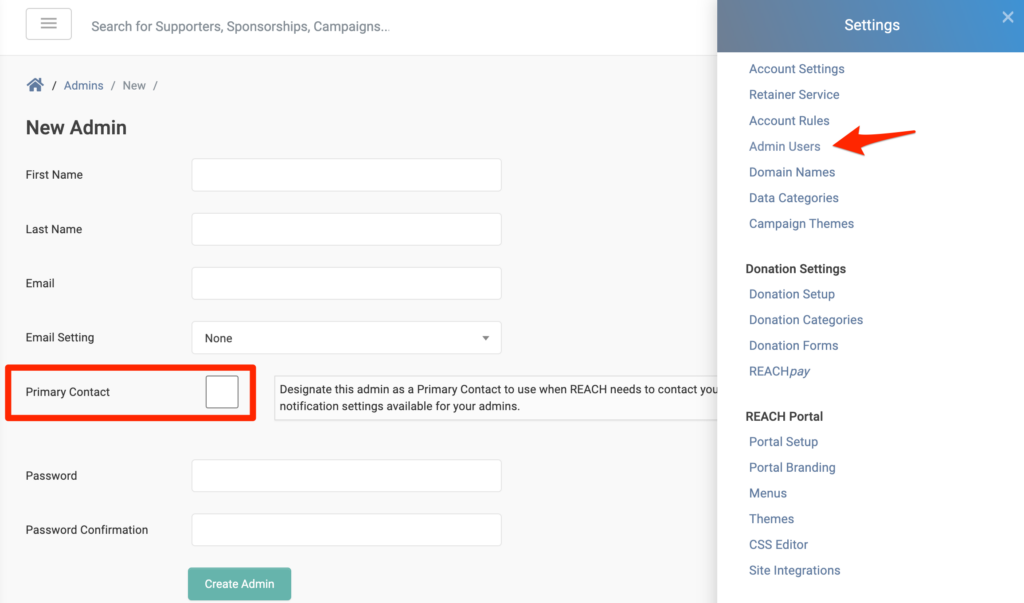
- Go to Settings > Admin Users
- Click on +New Admin
- Enter in the various fields
- Choose the Admin Email Setting, based on preference in receiving no notification emails, immediate emails or daily emails
- Mark as a Primary Contact if applicable. More than one Primary Contact can be added per organization.
- Note: It is important that at least one Primary Contact is marked for each organization. REACH will send an email to Primary Contacts if there is an important change coming soon, a scheduled maintenance or when direct contact with an admin is needed.
- Passwords:
- Admin passwords must be a minimum of 12 characters with numeric and alpha characters.
- When updating a password, four changed characters are required.
- For added security, a password reset is required upon initial login.
- Note: If an admin forgets their password, they must use the password reset link on the admin login page.
- Click Create Admin
Once an Admin User is created, you can Edit the Admin User to:
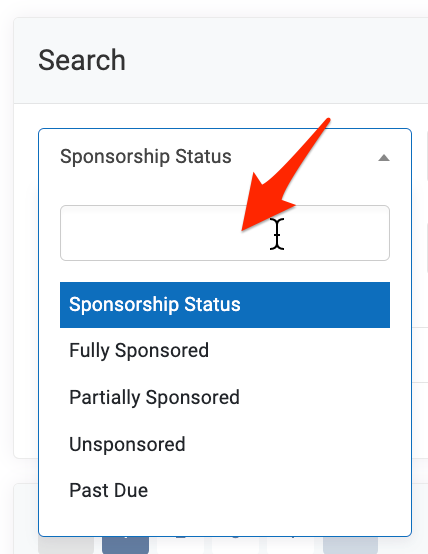
- Disable searchable dropdown selects in the admin console, which will disable the search box in the dropdown options throughout the Admin Console (shown below). This is optional and based on personal preference.
- Enable Two Factor Authentication, more information below
- Modify Permissions, Notifications, and Projects/Places access for that particular admin.
To delete an Admin that is no longer with your organization, simply click on Delete next to their name.
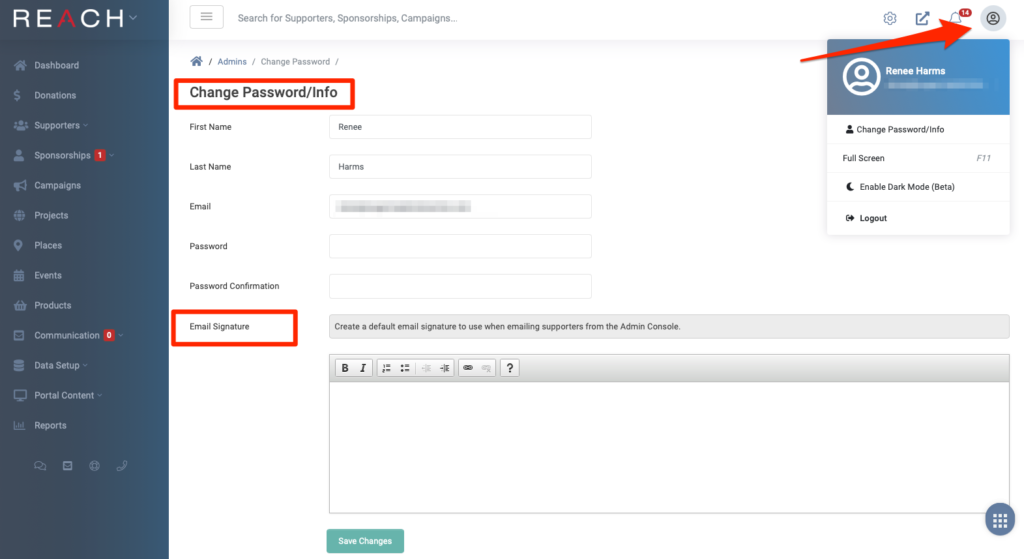
An admin can create their own signature to use when sending out correspondence to a Supporter. To do so, navigate to the top right of the admin console, click the Profile icon then select Change Password/Info, and create the signature in the box provided.
Admin Permissions
Admins Permissions, available for those on our Essentials, Pro and Pro Plus plans only, is a security feature that allow organizations to configure granular access to their various admins for these areas in REACH.
Reminder, we have a Role Based Admin Permissions Guide.
- Account Settings – Manage account information, billing details, domain names, campaign themes, donation setup and giving options.
- Admin Users – Manage administrators and permissions.
- Campaigns – Manage campaigns and relationships with supporters.
- Categories – Manage sponsorship category setup.
- Communications – Create messages, emails, text messages and push notifications.
- Content – Create albums, pages and upload media files.
- Conversations – Manage conversations between supporters and sponsorships.
- Custom Forms – Manage custom forms.
- Data Import – Manage importing information into REACH.
- Donations – Manage donation records.
- Events – Manage events and event registrations.
- Notes – Add Notes on records.
- Places – Manage places and relationships with supporters.
- Portal Design – Manage the design elements of REACH like CSS, page templates and email templates.
- Products – Manage products and orders.
- Projects – Manage projects and relationships with supporters.
- Reports – Run reports on all activities.
- Sponsorships – Manage sponsorships and relationships with supporters.
- Sponsorship Supporters – Manage the relationships between sponsorships and supporters.
- Sponsorship Types – Manage sponsorship program setup.
- Supporter Payment Methods – Manage the payment methods of supporters.
- Supporters – Manage supporter records.
- Tasks – Allows you to manage and view tasks for all admins within the account. With Read Only access, you can view tasks created by other admins but cannot create tasks for them. With No Access, you can create your own uncategorized tasks, but you cannot view or create tasks for other admins.
Permissions can be limited to Give Access, Limit to Read Only or No Access.
- Give Access allows the new admin to see the area and make changes.
- Read Only allows the admin to only read the information. Note: To restrict to Read Only, you must select both Give Access and limit to Read Only.
- No Access does not allow the admin to access or see the area at all. To do this, both boxes should remain unchecked.
Note that Permission settings will also affect the Dashboard view for the user. For example, if an admin has No Access to Sponsorships, they will not see sponsorship details on the Dashboard.
If you want to remove the Dashboard numbers from being displayed for certain admins:
- Go to Settings > Admin Users
- Next to the Admin User’s name, click Edit
- Under the Permissions tab:
- Uncheck both boxes for Give Access and Limit to Read Only for:
- Supporters to remove the Supporters number
- Donations to remove the Donations YTD number
- Sponsorships to remove the total number of Sponsorships number
- Sponsorship Supporters to remove the Active Sponsors number
- Click Save Changes
Two-Factor Authentication
Each Admin account also has the option to enable Two-Factor Authentication (2FA) for their personal REACH Admin account.
View our Two-Factor Authentication article to learn how to set up 2FA for your REACH Admin account.
Notifications
The Notifications tab is where you can select what notifications and blind copies an admin will receive from the system.
For example, if you have an admin that needs to be updated when a recurring donation fails, they can be blind copied on all emails sent to supporters for a Failed Recurring Donation. Or, if there is one person responsible for managing Supporter Conversations, select the Conversations box so they will be notified when a Supporter sends a message to their Sponsorship. Refer to our Role Based Admin Permissions Guide for our notifications suggestions based on role.
The Admin Email Setting gives you the option of when/if you would like the system to notify you of any updates or changes an admin made, such as assigning a Task, updating a Sponorship profile, or adding a news update (Message) or photo to a Project. We recommend this be set to Daily or Never. This is unrelated to the listed Notifications an admin can select..
Please note that all notification emails from REACH will come from the email address notifications@reachapp.co.
Projects/Places
If needed, you can restrict access of an Admin to a subset of sponsorships based on the Project or Place a sponsorship is associated with.
The Admin’s access to Sponsorships will be scoped based on the Places or Projects selected. If the admin is not associated to any Place or Project and has access to Sponsorships, the admin will be able to manage all records. More than one Place or Project can be selected for an Admin.
Once complete, be sure to scroll down to the bottom of the page and click ‘Save Changes.’
Let’s Get Social