You can accept ACH/EFT donations using REACHpay as your payment gateway. This article explains how to enable ACH/EFT for your account and how supporters can add and use their US bank accounts when donating.
Note: ACH/EFT is only available to organizations using REACHpay. If you’re using a different payment gateway, refer to our list of supported gateways that accept ACH/EFT.
Quick Start: How to Begin Using ACH/EFT with REACHpay
For Organizations:
- Email Support to enable ACH/EFT on your REACHpay account.
- ACH/EFT is free to enable. Fees are 1% + $1 per transaction.
- Optional: Update your Suggested Additional Donation Amount at
Settings > Donation Setup > Donation Form Settings.
For Supporters:
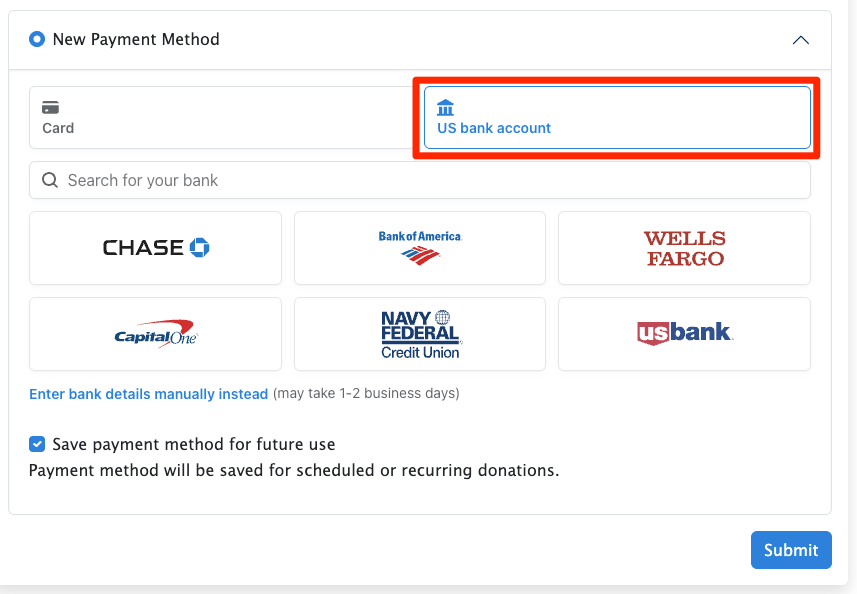
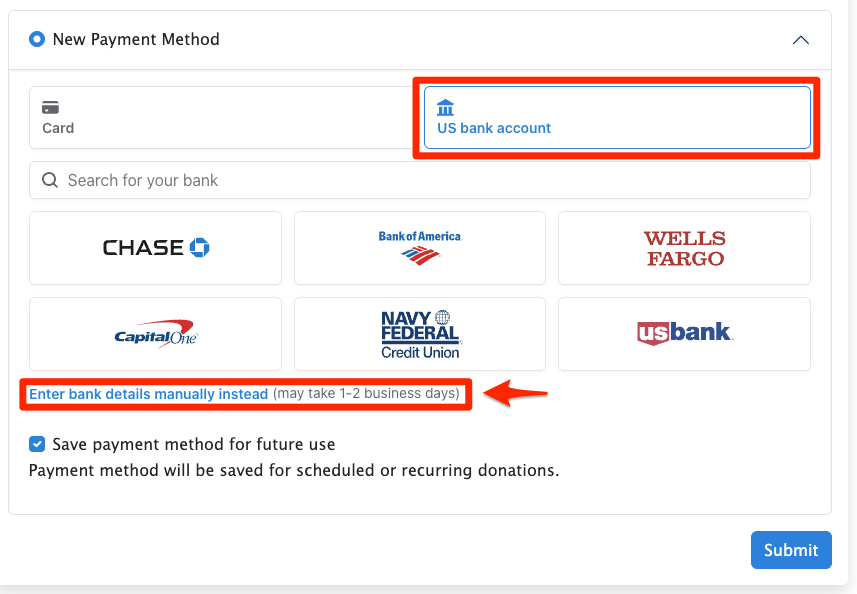
- On the donation form, choose US Bank Account to login to your bank to verify your account or click Enter bank details manually instead to enter account details and verify via micro deposits
- Once verified, the account can be saved and used for recurring donations.
Enabling ACH/EFT for Your Organization
If you’re already using REACHpay and want to begin accepting ACH/EFT donations:
- Email Support to request that ACH/EFT be enabled.
- Once enabled, supporters will see US Bank Account as a payment option on the donation form and in the Donor Portal.
Transaction Fees:
- Free to enable
- 1% + $1 per ACH/EFT transaction
Note: You can ask donors to help cover processing fees by updating the Suggested Additional Donation Amount under:
Settings > Donation Setup > Donation Form Settings
Note: The suggested amount is the same regardless of whether the supporter uses a card or bank account.
Timing:
- Funds are typically withdrawn within 1–3 business days. During this time, donations are marked as pending.
- To view a list of pending donations, generate a Donation Details Report and set the Status filter to Pending.
- Donations are marked complete in REACH within 2–4 business days.
Supporter Setup for ACH/EFT Donations
Supporters have two secure options to add their US bank account for donating.
Note: Only the supporter can complete this step, as account verification is required to confirm ownership.
Once verified, the bank account can be saved, used for future donations, and set as the primary payment method or used for all recurring donations.
Option 1: Link a US Bank Account (Instant Verification)

This method uses bank login credentials to verify the account immediately.
Steps:
- Select US Bank Account
- Choose their bank from the list
- Agree to terms and conditions
- Log in to their online banking
- Select the account to link
- (Optional) Save payment method for future use
Confirmation Email:
After setup, supporters receive an ACH Confirmation Email with:
- Agreement Date
- Account Holder Name
- Financial Institution
- Routing Number
- Last 4 digits of the Account Number
Option 2: Micro-Deposit Verification (Manual Entry)

This method does not require bank login but takes longer to complete.
Steps:
- Click on US bank account and then Enter bank details manually instead
- Enter routing and account numbers
- Wait for 1–2 small deposits to appear in their bank account (could take 1-2 business days)
- Follow instructions in the confirmation email or use the verification link to enter the 6-digit code from the deposit statement description

When setting up an ACH account using micro-deposit verification, all verification steps must be completed before the ACH bank information will appear as an available payment method on the supporter record. At this point, the account will be available to use and save.
ACH Processing Timeline & Donation Statuses
ACH donations follow a multi-step processing timeline. Once an ACH donation is initiated, funds are typically withdrawn from the supporter’s bank account within 1–3 business days. During this period, the donation will display a Status of Pending in REACH.
To view pending ACH donations, generate a Donation Details Report and set the Status filter to Pending.
After funds are successfully withdrawn and processed, donations are marked Complete in REACH within 2–4 business days. From start to finish, ACH donations typically move from Pending to Complete within 4–6 business days.


Let’s Get Social