
If your organization uses REACH for its website and your account was created before February 2026, your website may currently be powered by a Theme.
Portal Templates are REACH’s modern website-building experience. They give you more flexibility, easier updates, and a cleaner way to control the layout and structure of your REACH website – without requiring HTML or custom code.
This guide walks you through moving your existing REACH website from a Theme to Portal Templates while keeping your current website live during setup.
Themes are designed for teams that want full design control and have development resources available.
What to Expect
Migrating from Themes to Portal Templates is designed to let you build and review your new site before making it public.
During the migration:
- Your existing Theme remains your public website while you set up Portal Templates.
- You can customize and preview your Portal Templates using the Staging environment.
- Publishing your Portal Templates does not deactivate your Theme.
- You decide when to make the switch.
- Your Portal Templates become your public REACH website only after you manually deactivate your Theme.
- Your existing REACH content is not deleted or recreated during the process.
Important: Publishing your Portal Templates and launching your Portal Templates are two separate steps. Your existing Theme remains your public website until you deactivate it.
Migrating from Themes to Portal Templates Video
Watch this walkthrough to see the complete migration process, including activating Portal Templates, customizing and previewing your site, publishing your changes, and deactivating your Theme when you’re ready to launch.
Migrating from Portal Templates Webinar
For a more in-depth look at Portal Templates and the migration process, watch our recorded webinar here.
Step-by-Step Migration Process
Step 1: Activate Portal Templates
Go to Portal Content > Portal Templates and click Activate Portal Templates.
This is a one-time step that adds the default Portal Templates to your account so you can begin reviewing and customizing them.
After activation, you can work on your Portal Templates without affecting the Theme your website visitors currently see.
Use Staging to customize, preview, and test your Portal Templates before you’re ready to launch.
Your Theme will remain your public website throughout this process.
Step 2: Customize Your Portal Templates
With Portal Templates activated, you can begin customizing your new site while your existing Theme remains active.
Tip: For a quick walkthrough, watch our Setting up your REACH Portal: Portal Branding and our Setting up your REACH Portal: Portal Templates videos.
You can also use these guides as you customize your site:
- Portal Branding – manage your fonts and colors
- Portal Templates Overview – learn how to edit Portal Templates and review the available templates
We recommend customizing your site in the following order:We recommend starting with:Recommended order for customization:
- Review your Portal Branding
Go to Portal Content > Portal Branding and review your fonts, colors, and other branding settings. When migrating, your existing colors and branding are copied over, but it’s still a good idea to confirm everything looks correct.
- Customize your core site templates first:
We recommend starting with:
- Review your navigation menus.
Go to Settings > Menus and configure your menus based on the REACH features your organization uses. For example, if you aren’t using Campaigns, you may want to remove Campaigns from your main navigation.
- Review the remaining Portal Templates.
Click through the remaining templates and make any additional changes needed for your organization.
- Preview your work as you go.
Use the available preview options within your Portal Templates to review your changes before publishing.
You can take your time during this step. Your Theme continues to be your public website while you customize Portal Templates.
Step 3: Preview and Test Your Site
Before publishing your Portal Templates, review your new site in Staging and make sure everything works as expected.
Click View Staging Site to review the full website, or use Preview Changes while working within an individual Portal Template.
We recommend checking:
- Your branding, fonts, and colors
- Your Header and Footer
- Your main navigation and menus
- Links throughout the site
- Your key Portal Templates and content
- Sponsorship flows
- Payment and checkout flows
- How your most important pages appear to visitors
Make any necessary changes and preview your site again before moving forward.
There is no automatic switch to Portal Templates, so you can continue reviewing and making changes while your Theme remains live.
Step 4: Publish Portal Templates
Once you’ve finished customizing and testing your Portal Templates, you’re ready to publish your Staging changes.
From Portal Content > Portal Templates, click Actions > Publish Staging to Live Site in the top-right corner.

Publishing your Portal Templates does not deactivate your Theme.
Your existing Theme will continue to be the website your visitors see until you complete Step 5 and manually deactivate it.
This gives you control over when the final switch happens.
Before moving to Step 5, confirm that you have:
- Reviewed your site using View Staging Site
- Published your latest Staging changes
- Tested your menus and important links
- Reviewed your branding and core templates
- Tested important sponsorship and payment flows
Once you’re satisfied with your Portal Templates, you’re ready to complete the migration.
Step 5: Deactivate Your Theme
Deactivating your Theme is the final step that makes Portal Templates your public REACH website.
When you’re confident your Portal Templates are ready:
- Go to Settings > Themes.
- Find your active Theme.
- Click Actions > Deactivate.
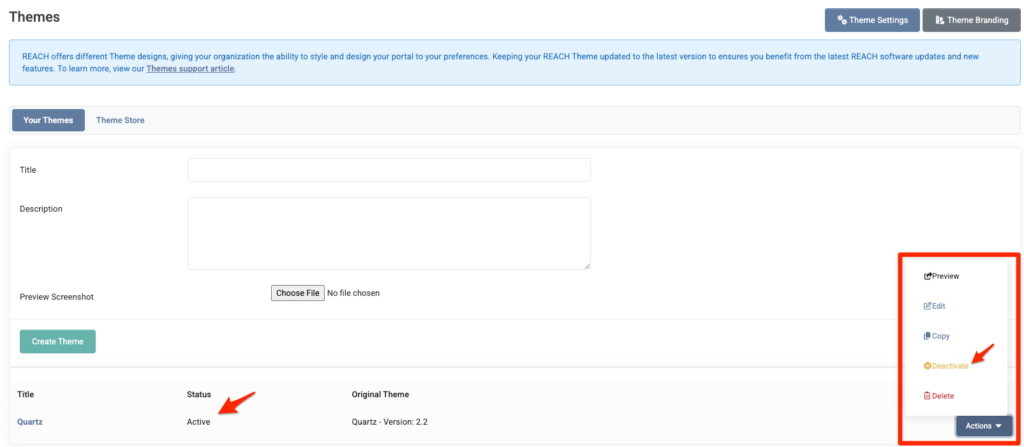
Once the Theme is deactivated:
- Portal Templates become your live website.
- View Live will display your Portal Template site.
- Your Theme will no longer be active.
- Portal Templates will become your primary REACH website experience.
Your migration is now complete.
What Happens to My Content?
Migrating from Themes to Portal Templates changes how your REACH content is displayed—it does not remove or recreate your content.
Your existing content, including:
- Sponsorships
- Campaigns
- Projects
- Places
remains in your REACH account and continues to work with Portal Templates.
No content recreation is required. You’re simply customizing how your existing REACH content is displayed through your Portal Templates.
Frequently Asked Questions
Will my website go down during the migration?
No. Your existing Theme remains your public website while you customize and test Portal Templates. Portal Templates do not become your public website until you manually deactivate your Theme.
What happens when I publish Staging to Live while my Theme is still active?
Publishing your Staging changes prepares your Portal Templates for launch, but it does not deactivate your Theme. Your existing Theme will continue to be the public website your visitors see until you manually deactivate it.
Can I switch back to my Theme?
Yes. If you decide you need to switch back, you can reactivate your Theme. We recommend thoroughly reviewing and testing your Portal Templates before deactivating your Theme.
Do I need developer support to migrate?
No. Portal Templates are designed to be customized without HTML or custom code.
Will I lose any of my existing REACH content?
No. Your sponsorships, campaigns, projects, places, and other REACH content remain in your account. Portal Templates control how that content is displayed on your website.
How long does migration take?
The amount of time needed depends on your customization needs and internal review process. Most organizations can complete their setup and launch within a few days or weeks.
Want Help with the Portal Templates transition?
Our team can migrate your site from Themes to Portal Templates using our Retainer Service.
The estimated cost is $200 (2 hours at $100/hour).
To get started, go to Settings > Retainer Service:
- Click Add Hours to add and pay for 2 hours.
- Go to the Retainer Work tab.
- Add Migrate from Themes to Portal Templates.
- Submit your request.
Once submitted, our team will receive your request and follow up with you.