With REACH, you can create any number of online fundraising campaigns that are easily shareable on your website, social media or email marketing campaigns.
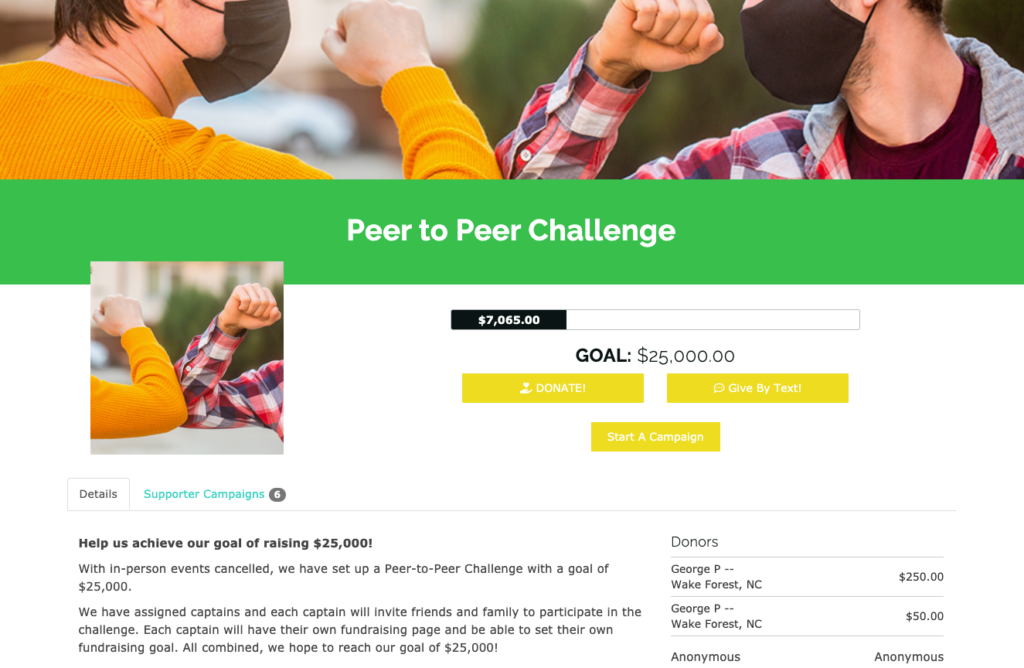
The public Campaign page includes a cover image, title, profile image, live giving thermometer, goal amount, donate button, give by text button, start a campaign button, detail section, message tab area and donor list with donation amount.
Organizations can click on Actions > Generate QR Code to quickly generate a QR code that they can use to digitally direct supporters to their main Campaigns page.

Note: If your organization runs fundraising campaigns in REACH, we highly recommend that you update to the latest REACH Theme.
Newer features such as the Give by Text and Live Giving Thermometer are only available using the latest Theme update.
Keeping your REACH Theme current will enable you to get the most up-to-date features and capabilities for your Campaigns. If you need help with this, please contact our Support team.
You can customize the design of your campaign, create a campaign theme, associate a group to a campaign, add images and videos, set campaign goals and end dates, add donation levels, provide regular updates on your fundraising pages, allow anonymous giving and include a text to give option.
Supporters can also create their own fundraising campaigns to fundraise on your behalf. To learn more, see the article: Starting a Fundraising Campaign from the Donor Portal.
From your Admin Console, you can view, add and edit Campaigns.
The Campaigns page gives you a quick overview of all campaigns, including ones created by supporters and ones started by an admin. You can click Actions for a list of available actions regarding your Campaign including copying, deleting and starting a new message or mailing.
The Ended/Disabled tab lists your Campaigns that have ended or you have chosen to pause or no longer run.
The Awaiting Approval tab lists your supporter started Campaigns that are pending Admin approval.
Click on the Campaign’s name to see details of the campaign – including a graph of donations, amount raised, proximity to your goal and any associated tasks and reminders for your campaign.
The Donations column will list the donations made to your campaign. Clicking on a Supporter’s name will take you to their profile page.
Should you receive a donation to your campaign via check or cash, an admin can add these into the Campaign as an offline donation. Go to Donations > +New Donation, select the Supporter and then in the Purpose drop-down, select your Campaign. Enter in all other donation details and click Create.
You can edit the campaign, create a message about the campaign that will appear on the campaign public page, or send a new mailing to contact supporter’s of the campaign.
Clicking on + Task enables you to assign a task to another admin regarding the Campaign that includes a due date.
You can view your Campaign, by clicking on View Public Page.
Clicking the Export Campaigns button gives you a comma delimited csv file of all campaigns that you can copy and paste into a text editor. Once generated, you will receive an email with a link to download the file. From there, you can import the file into a spreadsheet or other application that accepts csv files.
Watch Webinar
Watch our Tips and Tools for your Fundraising Campaigns Webinar to learn all REACH has to offer for your fundraising campaigns. We went over creating a gift catalog, setting up a campaign, sending to a mailing list from reports, setting up a special donation form and setting up text to give keywords and more.
View our Webinars page to register for upcoming webinars.


Let’s Get Social