In this article, we will provide instructions for creating custom fields for your sponsorships in REACH.
Custom fields define what demographic and other information you want to capture about your sponsorships and can be shown publicly, to Admins only or to Sponsors only when logged into their account.
There is no limit to the number of custom fields you can create for your sponsorships. Custom fields can be shown publicly, to only admins or only sponsors.
Some example sponsorship custom fields we commonly see are:
- Admin Sponsorship Notes (Admin Only View)
- Gender (Dropdown Select of M/F)
- Grade (Dropdown Select or Number)
- Favorite Activity (Single Line Text)
- Favorite Color (Single Line Text)
- Immunization History (Table with Fields of Title, Date, Notes)
- Updates for Sponsors (Sponsor Only View)
- Date Joined Program (Date)
- Deposit Held (Dropdown Select of Y/N)
- Founding Member (Dropdown Select of Y/N)
- Spouse Date of Birth (Date)
- Interested in Volunteering (Dropdown Select of Y/N/Unsure)
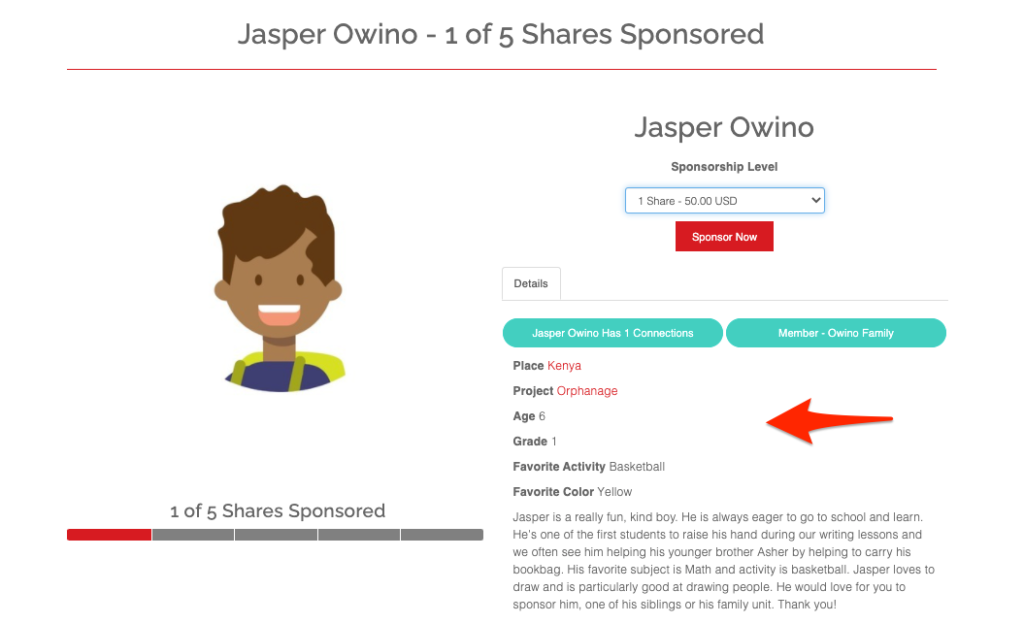
Here is an example of an individual sponsorship’s profile page, for Jasper Owino, that includes custom fields. The custom fields are Grade, Favorite Activity and Favorite Color.

NOTE: Jasper’s Age is displayed because his birthdate was imported or added in the system Date of Birth field. For privacy concerns, REACH does not display actual dates of birth on the public side but instead, automatically converts the birthdate to a calculated Age. Thus, birthdate and age fields are not generally needed as custom fields.
Creating a Custom Field for your Sponsorships:
- Go to Data Setup > Custom Fields
- Click on + New Field
- Add a Title
- Choose Sponsorship Type as your Referral
- Check the box if you want to Show in Admin Console only
- Check the box if you want to Show to Sponsors only.
- Note: Sponsors must be logged in to their Donor Portal to view.
- Check the box to Auto-Increment Value as a Unique ID.
- Note: This is ideal for organizations seeking increased sorting ability. We commonly see this used when organizations bring in sponsorships from a previous system that have been assigned a Unique ID. As new sponsorships are added within REACH, they want to keep assigning a Unique ID in order.
- If checked, you can input the First Unique ID. This is the first number that will be assigned. Auto-incremented values for your records will add 1 to this base number going forward. (i.e. 1 to start with the number 1; 100 to start with the number 100)
- Select the Type of Data:
- Single Line Text – a short text field to hold information such as a Nickname
- Paragraph Text – a string of text such as a sentence or paragraph
- Number fields are used for numbers such as Age.
- Note: For data that will need to be updated yearly (Grade / School Year for example), we recommend inputing as a Number in order for you to complete a Bulk Update yearly or as needed.
- Date fields are used for any calendar date
- Dropdown Select – to add multiple options to choose, for example a Gender field to select Male or Female; a Class field; or a Grade field.
- We recommend using a Dropdown select field whenever possible for Sponsorships as these will also be listed as a filter option on your Sponsorship Module. Using a dropdown field for items with a set selection of choices will also help ensure correct entry and spelling when manually entering information, especially if you have more than one Admin entering information.
- A Table can be created to hold a historical list of information.
- Common examples of custom fields using a Table are: Immunization History, Admin Sponsorship Notes, Extra Info and Report Cards.
- Note: Any Table field created for a Sponsorship or Supporter will be only available to Admins and will display as a tab on a record and will be shown in the Data Setup>Exports list.
- Click Create
Adding Custom Fields to Sponsorships
The next step is to set up your sponsorship types and add your custom fields.
When creating or editing your Sponsorship Types, next to the Custom Fields field, be sure to click Add a Custom Field to add any sponsorship custom fields you have created. This will need to be done for each Sponsorship Type, as your custom fields can differ per Sponsorship Type. Once more than one custom field is added, you can drag and drop the fields to reorder as desired.

For additional options with your sponsorship custom fields, please view our Custom Fields article as custom fields are also available for your Supporters, Projects, Places and Campaigns. Options include the ability to bulk update custom fields at once (such as advancing a grade for a new school year) and completing a birth date conversion should you have created a custom field for Age.
Example of Sponsorship Custom Fields
Here are examples of a Sponsorship Custom Field created to display on your Sponsorship’s Profile Record.
Sponsorship Custom Field as a Paragraph Text
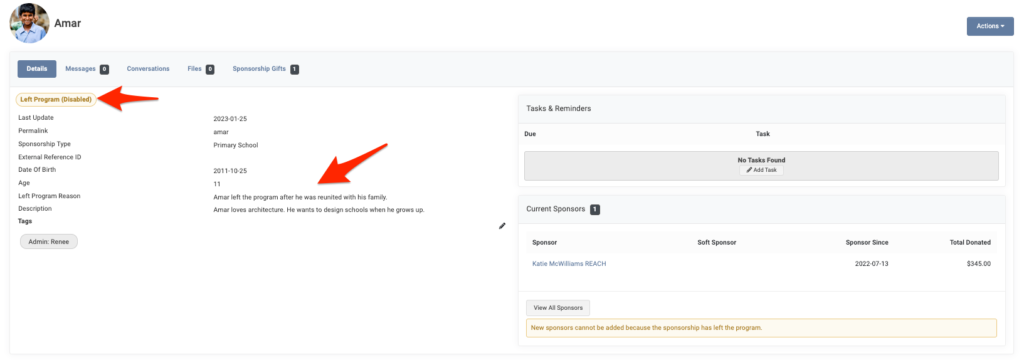
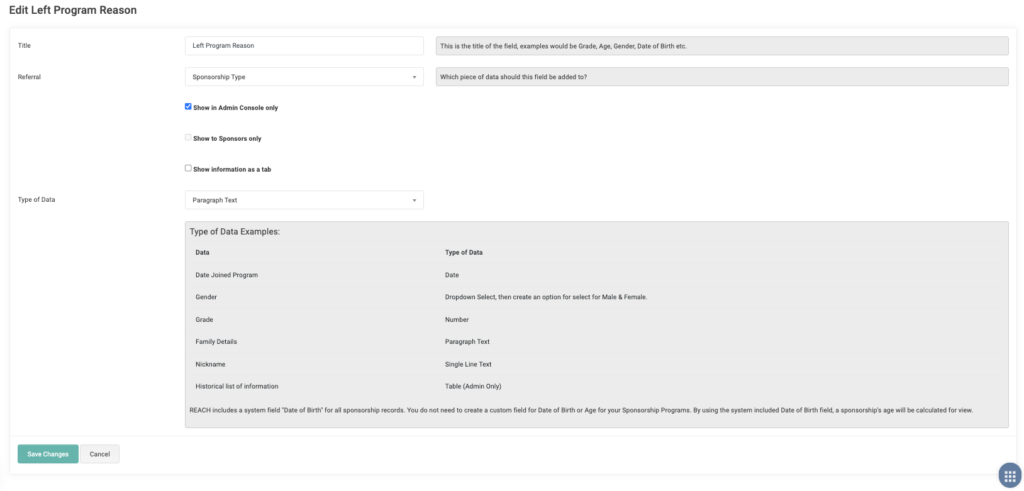
In this instance, we have created a Sponsorship Custom Field we titled Left Program Reason that is shown in the sponsorship’s profile view. We set this up as a Paragraph Text so it displays as a data field under the Details tab in the Sponsorship’s Profile Record. You can set up multiple sponsorship custom fields this way to capture the information you desire.


Here’s how:
- Go to Data Setup > Custom Fields
- Click +New Field
- For Title, we added Left Program Reason
- For Referral, choose Sponsorship Type to tie this to sponsorship records
- Click Show in Admin Console Only
- For Type of Data, we chose Paragraph Text
- Click Save Changes
Next, we want to associate this Sponsorship Custom Field to a Sponsorship Type. REACH does not automatically add this newly created custom field to all sponsorship types in order for you to have different custom fields for different sponsorship types.
Here’s how:
- Go to Sponsorships > Sponsorship Types
- Click on the Sponsorship Type you want this Custom Field to be included on
- Next to Custom Fields, click Add a Custom Field and select Left Program Reason (your newly created custom field’s title)
- Note: This must be done one at a time, but you can do this multiple times
- Click Save Changes
Now, when you go into any of your sponsorship records under that Sponsorship Type, you will see the newly created Sponsorship Custom Field listed as a field under the Details tab. From there, you can add and edit your records as desired.
Note: This field only displays if it has been filled out on the sponsorship’s record. To do that, click on Actions > Edit to edit the Sponsorship’s profile and add the reason the sponsorship left the program.
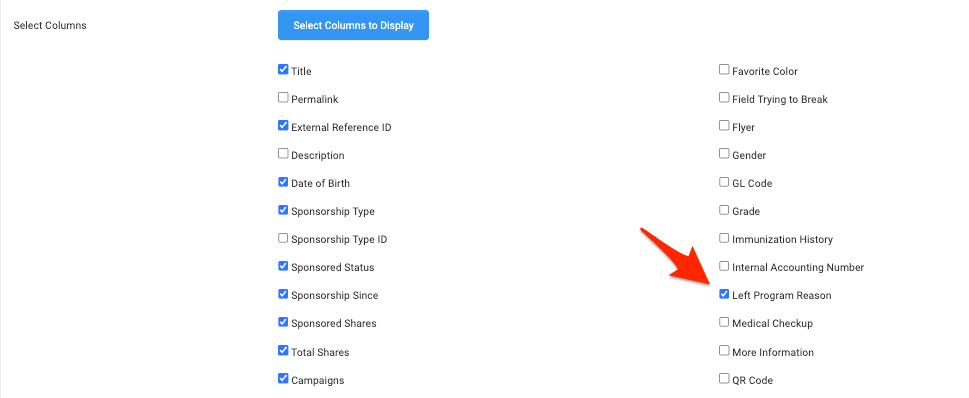
To generate a Report on the Left Program Reason field, go to Reports > Sponsorships. From this Sponsorship Activity Report, choose your date range and then then click on Select Columns to Display. You will see Left Program Reason as an available option since it was added as a custom field, check this box and any others, then click Search.

Sponsorship Custom Field as a Table
In this instance, we have created a Sponsorship Custom Field we titled “Sponsorship Notes” that is shown in the sponsorship’s profile view. We set this up as a Table so it displays as a tab in the sponsorship’s record. Setting this up as a Table will change the way a Report is pulled and allows you to include multiple fields on the same Sponsorship Custom Field (example: If Left Program or Graduated, why?, Left Program or Graduated Date).


Here’s how:
- Go to Data Setup > Custom Fields
- Click +New Field
- For Title, we added Sponsorship Notes
- For Referral, choose Sponsorship Type to tie this to sponsorship records
- Click Show in Admin Console Only
- For Type of Data, we chose Table
- For Fields for Table, we added the Fields:
- If Left Program or Graduated, why? as Paragraph Text
- Left Program or Graduated Date as Date
- Click Save Changes
Next, we want to associate this Sponsorship Custom Field to a Sponsorship Type. REACH does not automatically add this newly created custom field to all sponsorship types in order for you to have different custom fields for different sponsorship types.
Here’s how:
- Go to Sponsorships > Sponsorship Types
- Click on the Sponsorship Type you want this Custom Field to be included on
- Next to Custom Fields, click Add a Custom Field and select Sponsorship Notes (the newly created custom field’s title)
- Note: This must be done one at a time, but you can do this multiple times
- Click Save Changes
Now, when you go into any of your sponsorship records under that Sponsorship Type, you will see the newly created Sponsorship Custom Field listed as a tab. From there, you can add and edit your records as desired.
Since this Sponsorship Custom Field was set up as a Type of Data > Table, you can also export this information into a spreadsheet.

Here’s how:
- Go to Data Setup > Data Import/Export
- Click on the Exports tab
- Click on Sponsorship Notes (the newly created custom field’s title)
- Export the data into a spreadsheet or as a PDF


Let’s Get Social