REACH includes a built-in Event management system to help you plan and manage your volunteer event, formal gala, 5k race or any other event you need. Events tie directly into your supporter records by creating a donation listing from a ticket purchase.
When using Events, we highly recommend you use our latest REACH Theme – Ruby 2.3 or Quartz 2.3. Several features shown in these articles are only included when using our most recent Theme. Please refer to our Updating Your REACH Theme article for further instructions.
Events Features:
- Create any number of Custom Fields, allowing you to capture additional registration data on the Registration form.
- Includes a built-in Map to the Event’s location
- Choose from multiple Ticket Options: Free, Pay in Full, Deposit, Pay Later, Payment Plan, Suggested Donation.
- Set your Quantity, when Sales Start and End, Min and Max number of tickets per order
- Set Tax Deductible and Taxable ticket prices and deposit costs.
- Events tie directly into your supporter’s records. From your Supporter’s record, view the Event Registrations tab.
- Run an Event Registrations Report to quickly see your registration and attendee data.
Admin Notifications and Automations
Admins must have access to manage events and event registrations. This can be done by going to Settings > Admin Users and editing the Admin. Under Permissions, check the box for Events > Give Access and click Save Changes. Note that Admin Permissions are available for REACH Essentials, Pro and Pro Plus plans.
Admins can also set up an Admin Notification to be notified when a supporter has registered for an Event. Refer to our Admin Automations article for further instructions.
Supporter Notifications and Automations
When a supporter registers for an Event, if there is a cost for the ticket, the supporter will receive a donation confirmation email that will include the Event’s Title listed as the Purpose, the Total Amount of the Ticket(s) and the Item/Quantity/Price/Total Price which will be the Ticket Title / Quantity of Tickets / Base Price / Total Price. If your organization has Text to Give setup, the supporter will also receive a text message thanking them for their donation.
Additionally, you can choose to send an Event Registration Supporter Notification, that will send an email to your supporter with the message of your choice. We recommend including the Event Title, Event Dates and Event URL.
Note: If you are including a free ticket option, this will ensure that your supporter receives an email confirmation as a donation email is not sent for a free ticket.
Refer to our Supporter Notification article for our suggested, Example Message and further instructions of how to set this up.
Main Events Page (Admin-Side)
In your Admin Console, the main Events page will list all of your Events and includes:

- Ability to Add + New Event
- Link to View Calendar to see your events displayed on a monthly calendar
- Sortable View by All, Active, Unlisted, Ended
- Show # of Entries per page and Search Field
- Event Title, Start Date, End Date or All Day
- Registrations #, how many people have registered/purchased tickets
- Attendees #, how many people are attending
- Note: Registrations is the number of people that have registered or purchased tickets for your event. Based on how you set up your Ticket Options, you can have multiple attendees per registration. Attendees refers to the total number of people that will be going to the event.
From the Actions button, you can:

- Edit the Event
- Share the Event
- Note: This will provide you a link to the Event’s main page and a link to the Event’s Registration page.
- Send a New Email to the registrants that have an email on record
- Copy the Event
- Example: If you have a Fundraiser Dinner each year and most of your details for the Event are the same, you can use the Copy button to make a copy of the Event to edit each year.
- View an Event Registrations Report
- Unlist the Event
- Note: This will add the Event to the Unlisted tab and remove it from public view. Anyone with a direct link to the Event will still be able to view it.
- To Re-List an Unlisted Event, you can click on Re-List from the Actions button or Edit the Event and uncheck the box next to Unlisted. Be sure to click Save Changes.
- To Re-List an Ended Event, you will need to enter new dates, this should include a new Event Start date, Event End date and Ticket Sales Start At and Sales End At dates.
- Generate a QR Code
Main Events Page (Public-Side)
On your public REACH page, Events are displayed under About Us > Events by default.
REACH Tip: Refer to our Menus article for information on how to reorganize your menu.
Events will be shown with the profile image, title, description and date. Upon hovering over the Event, a Register Today button will display as shown under the Donor Appreciation Dinner Event.

Supporters can click into each Event to go to the Event’s information page.
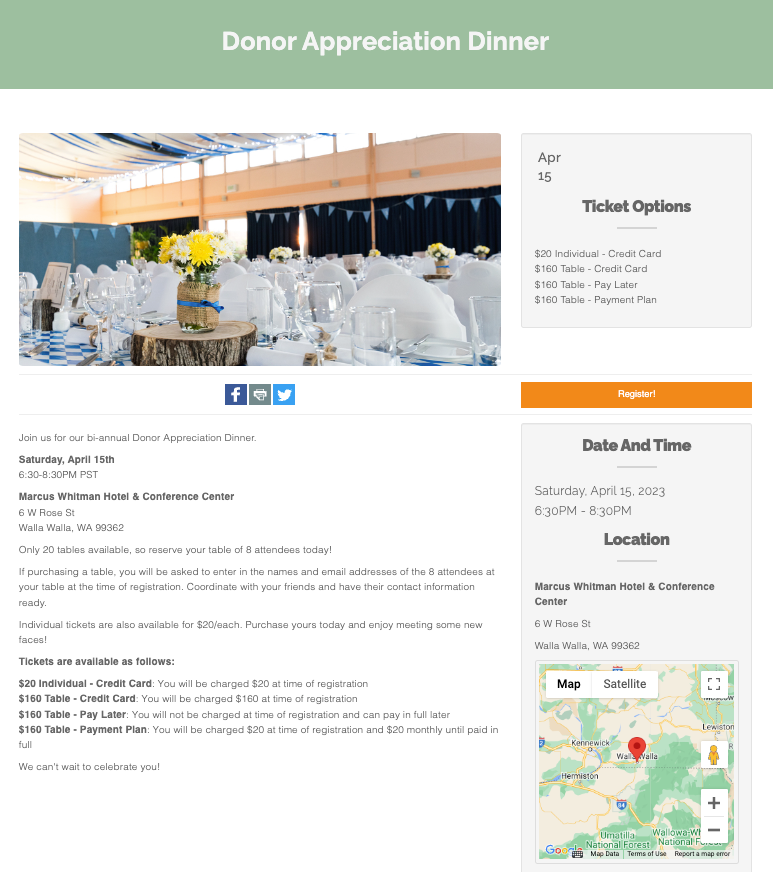
Shown below is a public view of an Event we created of a Donor Appreciation Dinner that includes 4 ticket options.

As shown, the Event’s individual page includes a title, profile image, ticket options, date and time, an included map if a location is provided, social share buttons and a description.


Let’s Get Social