Using REACH, you can create any number of unique donation forms and customize them to your preferences and embed them on your webpages or add links to your communications.
Default Donation Form
The default donation form looks like this:
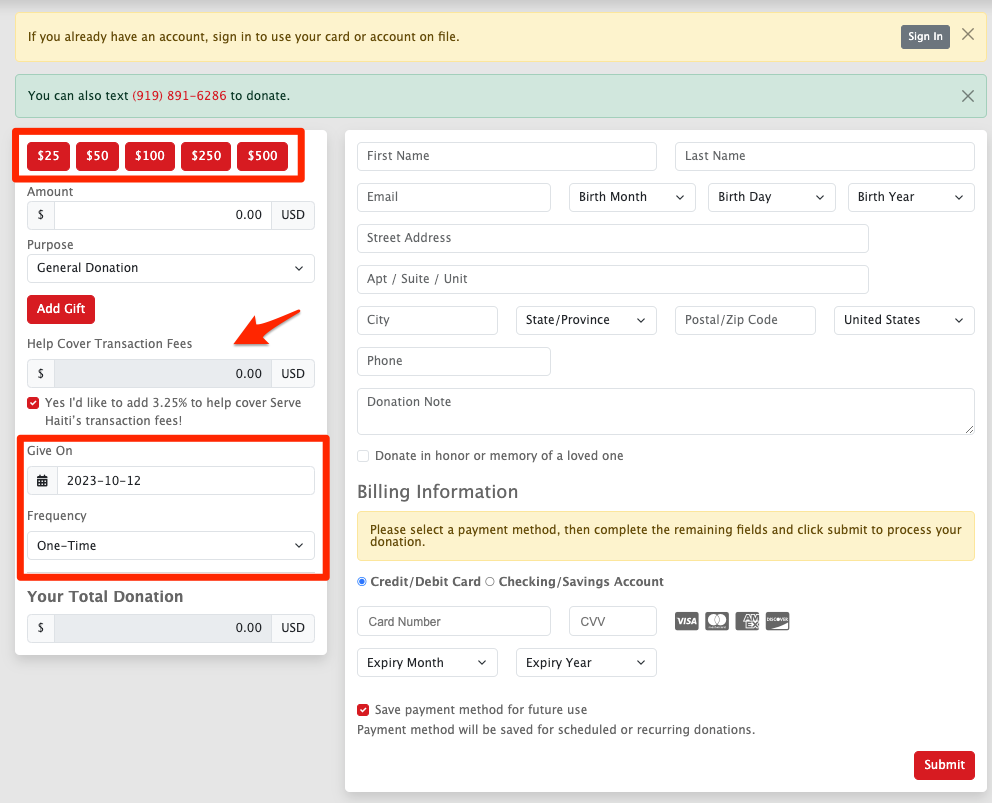
A few things to note:
- The yellow box is where supporters are encouraged to sign in to their Donor Portal.
- The green box is where supporters can text a phone number to donate, if you have Text to Give enabled. Note: Although this green box cannot be edited, you can choose to hide it. If you’d like to include a text phone number with more instructions, follow the instructions below to create a new donation form, set it to your default and include this information in the Header area.
- The $25, $50, $100, $250 and $500 donation levels are recommended donation amounts. If a supporter clicks on one, the form will auto-populate with those amounts. To update or remove these amounts, see below to create a custom donation form and then make that form your default.
- The Help Cover Transaction Fees is an option you can set under Settings > Donation Setup > Donation Form Settings tab. Commonly referred to as donation tipping, this is where organizations can set a percentage or flat amount that will be added to donations so supporters can help the organization cover their online transaction fees. The box is already checked by default but a supporter can uncheck the box if preferred. We’ve found the vast majority of supporters keep the box checked and add this amount to their donation.
- The Give On date is where the supporter can choose to donate today or in the future. If you do not want this included, go to Settings > Donation Setup > Donation Form Settings tab and uncheck the box next to Allow Supporters to Schedule Donations.
- The frequency is where supporters can choose to donate monthly, quarterly, bi-annually or yearly. For more information on this, refer to our Sponsorship Recurring Period Payment Options article.
- Your Total Donation auto-populates to the full donation amount.
- Your Supporter Donation Options can also be updated by going to Settings > Donation Setup > Donation Form Settings tab. Here, you can choose whether or not to require a billing address, phone number and date of birth.
- Some payment gateways require certain information so please check with your payment gateway prior to proceeding. REACHpay requires only the billing address, the phone number and date of birth are optional.
- If you choose to send a donation text message, you will need to require the phone number.
- The Donation Note is where a supporter can leave a note on their donation. This information is included on the Note field in the Donation Details page for each donation.
- The Donate in honor or memory of a loved one area is where, when checked, the supporter can include the Honoree’s Name, Email and Message.
- The Billing Information is where a supporter can add their payment information. Under Settings > Donation Setup > Credit Card Setup tab, you can choose which credit cards are supported by your payment gateway. Note: All are accepted when using REACHpay.
- If a supporter checks to Save payment method for future use, the payment method will be saved on their supporter profile record. If its a recurring donation and the supporter unchecks the box, the payment method will be saved to the donation so the recurring donation can run as intended; however, an admin will not be able to view the payment method on the supporter’s profile record.
Creating a Custom Donation Form (+ New Form)
There are two ways to create custom donation forms, both can be found by going to Settings > Donation Forms:
- + New Form button – Use when you want additional options such as donation levels, header and footer content and CSS styling
- Create Custom Donation Form Link button – Use when you want to set donation form parameters and amounts for your default donation form or one of your custom donation forms
Note: When using an embedded donation form, current supporters will not not be prompted to log in to access their payment information. However, if a current supporter uses the embedded form to make a donation, REACH will automatically attempt to match the donation to an existing support account by email address.
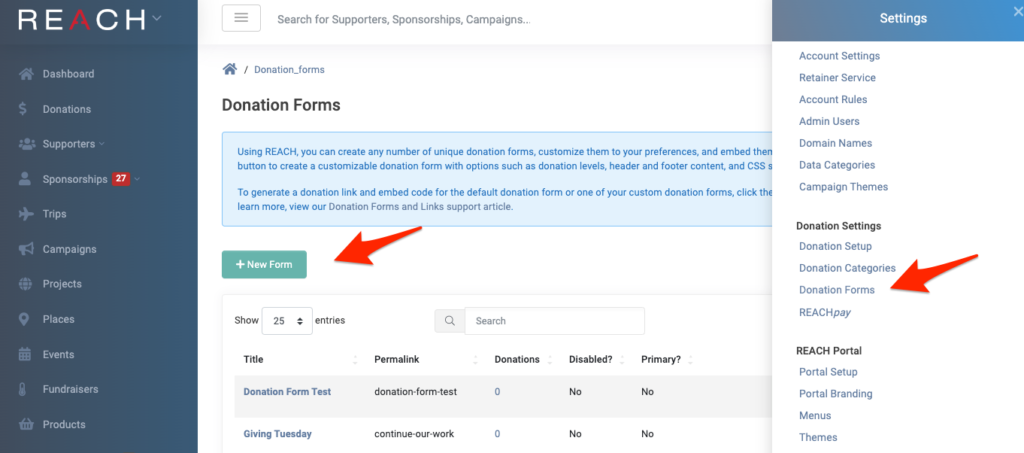
- Go to Settings > Donation Forms
- Click on the green, + New Form
- Under the Settings tab, include a Title
- Choose if you’d like to set as the Default Form
- Check the box if you’d like to Disable
- Under the Amount Levels tab, you can set pre-filled Donation Amount Levels to show on your donation form.
- Click Add Level
- Add a Title and an Amount
- Tip: You may wish to keep your Titles short in character length as these will be used in a donation form. You can always come back and adjust as needed.
- To Delete, click on the Trash button
- Continue to click Add Level to add multiple Levels
- Tip: You can change the order of the levels by dragging the levels up and down
- On the Form Elements tab, review the various elements for your donation form.
- Add any desired text for the text area next to the elements
- Add a Separator Label if desired
- Click on Add Elements to add any elements not required
- If you want to learn how new supporters found out about your organization, view our Capturing: How’d you hear about us? article.
- Change the order by dragging the elements up and down
- On the Header Content and Footer Content tabs,
- Include any desired paragraph text or images you’d like to explain the purpose of your custom donation form. You can use various font sizes and colors here.
- On the CSS Styling tab,
- REACH gives you the option to add custom CSS if you’d like to have more control over the appearance of your custom donation form.
- Once you’ve entered all the specifications, click Create Form.
From your Donation Forms list, click on the Action button to you can Edit, Share or Delete the Donation Form.
When you click on Share, you will be provided with the Link, the Embed Code and a button to Generate the QR Code.
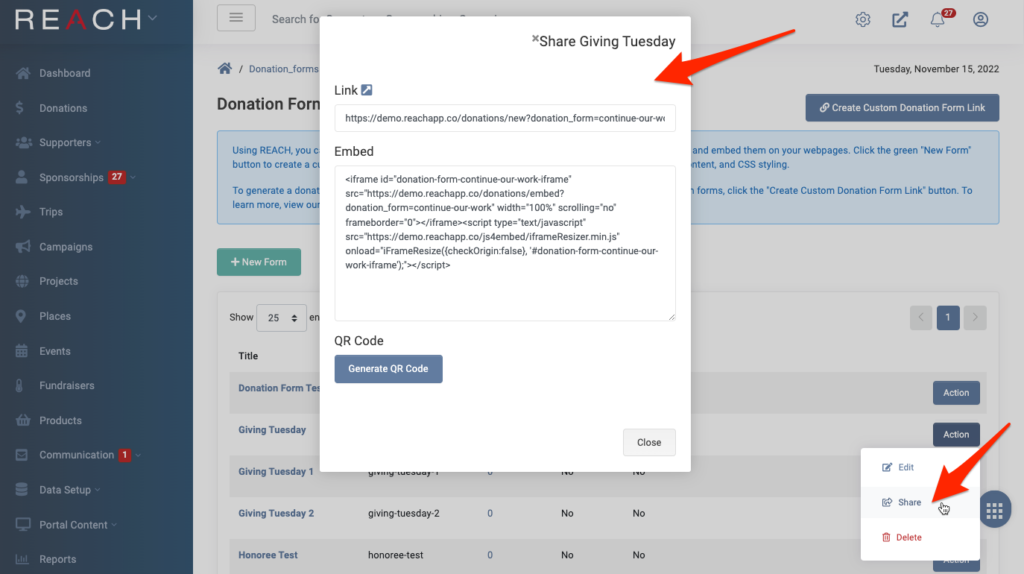
Copy the Link any time you wish to direct your supporters directly to the donation form.
Copy the Embed code and use it on any webpage you have access to edit the html. If you are using REACH as your website, refer to our Pages article to learn how to create a page and insert the embed code under Tools > Source Code.
Click the Generate QR Code button and a QR Code will be immediately downloaded that you can use to direct your supporters to the donation form.
Setting Donation Parameters (Create Custom Donation Form Link)
Note: Use this option when you want to set donation form parameters and amounts for your default donation form or one of your custom donation forms.
- Go to Settings > Donation Forms
- Click on the blue Create Custom Donation Form Link button
- Note: This process allows you to quickly input parameters such as a Purpose Type, Purpose, Affiliate and Amount.
- Set your Parameters
- Selecting a Purpose will set the form to that specific donation Purpose
- Set an Amount if you want to add a suggested amount in the field
- Select the Donation Form you wish to configure from the dropdown menu. This could be your Default donation form or one of your Custom Donation Forms that will automatically be shown here if created.
- You can set if a Donation is a Fixed Amount, Recurring, the Recurring Period if so, and Fixed Recurring

Click on Generate Link for the Custom Donation Form Link and Custom Embeddable Donation Form Code to be displayed.
To test the link, simply open a new browser window and paste the link into your URL bar. The donation page should load with the parameters set. The custom donation form link can then be added to any donate buttons or text you wish. It can also be used on your Portal Setup, as your Call to Action button.
Click on the Generate QR Code button and a QR Code will be immediately downloaded that you can use to direct your supporters to the donation form.
Let’s Get Social